Thursday, February 28, 2013

Dyed Glue

This is such a brilliant idea from Craft Knife!  Add some color to regular school glue your kids can literally "paint" with it!  All kids from little to older love to use glue - lots of glue.  The kids in my daycare used to make glue pictures and I wish I had thought of this when I had them as they would have loved it!!  Anyway - here's Craft Knife's awesome tutorial:


Tutorial: School Glue in Many Homemade Hues

You will be unsurprised to learn that we go through a LOT of glue around here. I try to buy the kids' glue only during back-to-school sales, when they're vastly cheaper than at other times, and I probably shop the back-to-school sales flyers even more avidly than the most penny-pinching parent of an institutionally-schooled kid, because whereas that parent might purchase one six-pack of Elmer's glue sticks for a dollar, I purchase ten of them.

The glue sticks give me agonies because of their plastic waste, but I still stock up because they're the best glue for all the daily little paper projects that the girls do, and they WILL go through 60 glue sticks in 12 months, I heartily assure you. I did better with the bottles of white school glue that I bought last year--I bought a dozen or so bottles (at a quarter apiece!) AND a gallon of Elmer's at the local office supply store. I took care of the small bottles, refilled them from the gallon jug as needed (as well as pulling from the gallon jug when I need glue for projects like gak and shaving cream puff paint), and did not need to purchase any new ones this year.

I over-purchased on the bottles last year (honestly, I DO know that even two children cannot each use six bottles of glue at the same time, three per hand) because I wasn't sure how durable they'd be for frequent refilling--those orange caps do break--but now that I've still got them, it's been in the back of my mind to do something fun with the extra bottles, to get them out of the glue bin and into the art rotation. I was thinking glitter glue, or perhaps tempera paint thickened with a little cornstarch, but finding this black glue and watercolor resist tutorial on the Pink and Green Mama blog was like some kind of personal jackpot for me.

I set out ten or so bottles of Elmer's glue--
--and let Syd pick out whatever colors she wanted from our collection of acrylic paints, then unscrew the cap of each bottle and squirt a couple of big squirts of one color into each bottle:
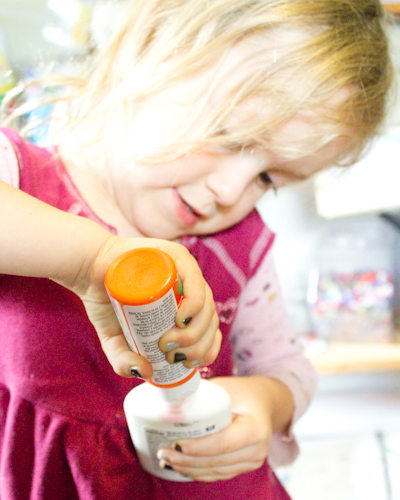
With that done, we reverted back to the black glue tutorial by shakeshakeshaking each glue bottle to mix the paint and glue together, then getting out the Strathmore watercolor paper to play with it all:
The watercolor paper is a nice choice because after the glue dries you can then add watercolors to your art, of course--
--although Syd found markers and colored pencils just as fun to work with on top of the glue.

My favorite part of this dyed glue is that it dries puffy, like the shaving cream + glue puff paint that the girls and I create sometimes, but unlike the shaving cream puff paint, this glue paint can live happily in its glue bottle on the girls' art shelves, to be taken down anytime they desire to make a little more art.

Wednesday, February 27, 2013

Spring Wreath

Wow - I have to say Wow.  I saw this wreath on Classically Amber's Blog and thought  - Wow that is beautiful, I want to make one.  I started reading how she made it and couldn't believe it - t-shirts cereal boxes - you've gotta be kidding me - how did you turn those things into this gorgeous wreath - well here's how she did it:


Super Easy Spring Wreath

What’s not to love about taking unused stuff around your home and turning it into cutesie decor? I was really wanting to make a Spring wreath, but I didn’t want to have to go shopping to do it. So I started looking through all my craft supplies, clothes and Goodwill boxes. I’m sorry to say that there are 2 shirts that will never make it to GW. Also…the recycling bin will never lay eyes on some empty cereal boxes. Sorry ’bout that. That’s right, for this project, I used:
  • 3 cereal/cracker boxes
  • 2 shirts – cut into 2-3″ wide strips, top to bottom
  • leftover scrap fabric
  • double satin ribbon
  • pompom trim
  • hot glue
Basic Steps:
  1. Cut out large doughnut from cereal boxes
  2. Cut out smaller circles of various sizes from cereal boxes
  3. Twist fabric around and glue down to small circle cutouts, resembling flowers
  4. Glue down fabric flowers to the doughnut cutout. Fill in gaps with ribbon and pompom trim.
  5. Glue ribbon strip to back of doughnut to hang wreath by
  6. Step back and adore your new Springtime wreath!
Now this is how I did it – in more detail. First, take 2 cereal boxes and find the side seams to unglue them. Lay them down flat, one on top of the other with the plain chipboard side facing up and try to match up the lines [just being OCD or CDO, depending on how obsessive you truly are!]. On the ends of the boxes where they overlap, cut off the flappy parts. You want a straight line where they meet up. Now using your hot glue gun, generously glue one on top of the other. When it dries, you’ll have a bigger area to work with to make your wreath. [So obviously, if you wish for a smaller wreath, you could prob get away with just using one cereal box]. Next, free form draw a big circle over both boxes. About 3 inches in, draw in a smaller circle. It should look like a doughnut, or at least somewhat resemble a doughnut of some sort. It doesn’t have to be perfect. No one will see this part. It’s just the wreath form – or base of your wreath. Cut out the doughnut.  Tip: if you absolutely must get your circle draw on perfectly, then look around your kitchen for bowls and use those to trace around.
With your leftover boxes, draw on smaller circles of various sizes. Tip: use different sized cups if you need perfect circles. These will be the base for your fabric flowers. With your shirt strips, practice rolling up flowers – tight – flat on the table and see if you like the look. If not, experiment with different techniques. The way that I did mine was to start at one end of the strip, rolling it tightly while also twisting the fabric around and around towards the left while also rolling it onto itself. Does that make sense? If you like the look you’ve come up with, then you are ready to glue down. Trigger a big dot of glue onto the middle of your small circle cereal box cutout [with the cereal print side down]. Stick down the beginning rolled-up part of your fabric. Once it dries well enough [few seconds], begin twisting the fabric around the center…randomly gluing on both the board and inside bottom of the fabric and push fabric to it. When you get it all twisted up and glued together, it should resemble a flower – shabby chic-style if you did it my way. If there is any cereal box sticking out from underneath, just trim the board off.
If you want a similar explanation – but with pics – then check out My Sparkle’s fabric flower tut HERE. The differences with mine and her’s is that I wanted my flowers bigger and bulkier…and I was gluing directly to the cereal box circle cutouts. Plus, my flowers are a bit more free form. You can make your flowers however you wish~!
Make your flowers different sizes if you wish – small, medium and large. With your leftover scrap/sewing fabric pieces, you can make the smaller flowers. As you finish gluing each one up, start arranging them on your cereal box wreath form. When you get enough flowers and like the way you have them arranged on the wreath, glue them all down. With any blank spots, go back and add in loops of ribbon and pompom trim. That way, you’ll get a really full, stuffed looking wreath.
On the back, glue one strip of ribbon so that you can hang up your wreath. On one side towards the top, I also tied on a bow to complete the look. Do it however you like, though!
How much did this project cost me? ZERO DOLLARS. Love that. And love it’s shabby chic look!
Note: this wreath is definitely super easy to make. All crafts usually require time spent on them, so if it takes you 30 minutes to craft up or 2 hours, it is normally worth it if you get something cute in the end…especially if it is free! =-) Have fun w/this one.
If you try this, please let me know! I’d love to see how yours turns out, too~!  =-D

Tuesday, February 26, 2013

Button Bracelets

I found this idea on Creative Passage and fell in love!!  These bracelets are sooo adorable and so easy to make!  Just a chain, jump rings, and buttons.  You can easily tailor these to your own tastes just by using whatever buttons suit your fancy.  I really like those clam shell buttons - they came out so beautiful:


100_1462
100_1464
This was the first one I made…I used vintage buttons in blues and some new clamshell round buttons in a teal shade and a light blue shade(thank you JoAnns!)
And then there is this bracelet with the stamped words…imagine, strength, passion, integrity, focus.  I have had these rings for a while, just waiting for the perfect project.
100_1449100_1452
100_1454
And lastly, one that is made entirely of natural clamshell buttons (rectangles and three sizes of round buttons) and a few off center clamshell beads.   The base bracelet is a smaller more delicate chain.  Anyway, I have not yet finished!  I have lots more ideas for these bracelets…hmmm, thinking Christmas presents?
100_1456100_1460

Monday, February 25, 2013

Soap Making - Tips & Tutorials


Soap Making Recipes, Tips & Tutorials

www.teachsoap.com

valentines bathbombs tutorial
Save the Bath Bombs -- Valentines Style!
Teach Soap is the premier site for soap making tutorials, soap recipes, soap making tips and everything you’d want to know about making soap and other handcrafted products including lip balms, lotions, bath fizzies and much more.
From beginners to seasoned soap makers, Teach Soap has something for everyone! We cover everything from soap making recipes for beginners, to more complex cold process soap making recipes and techniques.

Easy Cold Process Soap Recipes

These simple cold process recipes are a great way to get started!

easy cold process soap making recipesEasy Shea Butter CP Soap RecipeCoconut Oil 16 oz.
Olive Oil 18 oz.
Palm Oil 16 oz.
Shea Butter 4 oz.
Tallow 16 oz.
Totals 70 oz.
5% Superfatted Lye Amount 9.815 oz.
Ounces of water recommended 23.100 oz.

Honey Bee Cold Process Soap Recipe

Olive Oil 32 oz.
Palm Oil 16 oz.
Tallow 24 oz.
Totals 72 oz.
5% Superfatted Lye Amount 9.477 oz.
Ounces of water recommended 23.760 oz.

Here are more easy recipes for soaps, scrubs, lotions, and lip balms.

Aloha Melt and Pour Soap Recipe

melt and pour soap recipeThis recipe makes two pounds of beautifully, fragrant soap. View the complete Aloha Melt and Pour Soap tutorial.

Friday, February 22, 2013

Peanutty Buckeye Bars


PEANUTTY BUCKEYE BARS
from:   http://www.justcallmemaria.com/search/label/Cake%20Mix


 Ingredients:
1 19 1/2 ounce package brownie mix
2 eggs
1/3 cup vegetable oil
1 cup chopped peanuts
1 (14 oz) can sweetened condensed milk
1/2 cup peanut butter

  1. Preheat oven to 350 degrees. In a large bowl stir together brownie mix, eggs, and oil until combined. Then stir in chopped peanuts.
  2. Press half of the batter evenly into the bottom of a lightly greased 13x9 pan, set the other half aside.
  3. In a medium bowl mix sweetened condensed milk and peanut butter until smooth. Spread evenly over the brownie mixture in the pan. Take the remaining brownie mixture and separate into pieces, flatten them with your fingers into disks and evenly place on top of the peanut butter mixture in the pan.
  4. Bake for 28-33 minutes or until the top is set and the edges are lightly browned. Cool completely before cutting into bars.

Layer with waxed or parchment paper before stacking.


Thursday, February 21, 2013

Kids Jokes to Make you Laugh

My kids are 8, 6, and 2 and usually don't get any of my jokes :)  Which is OK, I still can laugh at my own jokes, but I found these very cute kid-friendly jokes from Childhood Beckons that will definitely make them laugh and might make you giggle too!


30 Kid-Approved Jokes


Silly Puns


1. Why did the chicken cross the playground?  
  -To get to the other slide.
----------
2. What do you call a pig that knows karate? 
  - A pork chop!
----------
3. Why do bees have sticky hair?  
  -Because they use honeycombs.
----------
4. Why was the man running around his bed?  
  -He wanted to catch up on his sleep.
----------
5. What does a robot frog say?  
  -Rib-bot. (Said in your best robot voice)
----------
6. Why is 6 afraid of 7?  
  -Because 7 8 9!
----------
7. What's black and white, black and white, black and white? 
  -A penguin rolling down a hill!
----------
8. Why do cows wear bells?  
  -Because their horns don't work!
----------
9. What does a snail say when it's riding on a turtle's back?  
  -Weeeee!!
----------
10. How did the barber win the race?  
  -He knew a short cut.
----------


Knock Knock Jokes


11. Knock, knock.  
  -Who's there?
Boo.
  -Boo who?
Please don't cry. It's only a joke.
----------
12. Knock, knock.
  -Who's there?
Nobody.
  -Nobody who?
(Stay silent)
----------
13. Knock, knock.
  -Who's there?
Interrupting cow.
  -Interrupting c..
MOO!!!
(Can be used with any animal. Just interrupt the other person with the corresponding animal noise!)
---------
14. Knock, knock.
  -Who's there?
Cows say.
  -Cows say who?
No silly, cows say moo!
----------
15. Knock, knock.
  -Who's there?
Owls say.
  -Owls say who?
Yep.
----------
16. Knock, knock.
  -Who's there?
Tank.
  -Tank who?
You're welcome!
----------
17. Knock, knock.
  -Who's there?
Little old lady.
  -Little old lady who?
I didn't know you could yodel!
----------


More Kid-Tested Jokes


18. What is brown and sticky?
-A stick!
Deborah from Learn With Play At Home
----------
19. Why did half a chicken cross the road?
To get to his other side!
JDaniel4'sMom from JDaniel4sMom
----------
20. What's mom and dad's favorite ride at a fair?
A married-go-round!
Henry son of Laura from PlayDrHutch
----------
21. Where do cows go on Friday night?
To the MOOOvie theater.
Krissy from B-Inspired Mama
----------
22. What did zero say to eight?
Nice belt!
Danielle from Mommy and Me Book Club
----------
23. Where do sheep get their wool cut?
At the BAAAbars!
Deborah from Learn With Play At Home
----------
24. Knock, knock.
-Who's there?
Banana.
-Banana who?
Knock, knock.
-Who's there?
Banana
-Banana who?
Knock, knock.
Who's there?
Orange.
-Orange who?
Orange you glad I didn't say banana again?
Danielle from 52 Brand New
----------
25. Where did the king keep his armies?
In his sleevies!
Kristin from Sense of Wonder
----------
26. Where do library books like to sleep?
Under their covers!
Kim from Adventures in Reading with Kids
----------
27. Why can't a bicycle stand up by itself?
Because it's two-tired!
From The Iowa Farmer's Wife
---------
28. Knock, knock.
Who's there?
Yourself.
Yourself who?
Your cell phone's ringing you better answer it.
From The Iowa Farmer's Wife
----------
29. How do you make a tissue dance?
Put a little boogie in it.
Kate from Picklebums
----------
30. Knock, knock.
Who's there?
Smell mop.
Smell mop who?
(Potty humor at it's finest)
Rachelle from Tinkerlab

Wednesday, February 20, 2013

DIY Bath Fizzies

Oh boy!  I have wanted to make these for a while now and I finally found a great tutorial on it!!  Make your own luxurious bath fizzes!! You should be able to get the molds at any craft store like Michael's or Jo Ann's.  Found this great tutorial from Martha Stewart:


How to Make Bath Fizzies

Martha Stewart Living, Holiday 2006
All it takes to make delicately scented tablets is a little mixing, some gradual spritzing, and a few minutes of molding. When you're finished you'll have dozens of effervescent treats in a variety of shapes and colors that will scent and soften bath water as they bubble. Stuff stockings with cellophane bags filled with stacks of the colorful blocks. They make great gifts for all the ladies on your list, including mothers, grandmothers, aunts, and grown-up nieces. Experiment with colors and scents; mix yellow and red to make orange, for example, and try blending lemon with lavender.

Tools and Materials
  • Baking soda
  • Cornstarch
  • Citric acid
  • Spritzer bottles
  • Food coloring
  • Glass bowl
  • Essential oil
  • Baking molds
How-To
1. Sift 1 3/4 cup baking soda, 1 cup citric acid, and 2 cups cornstarch through a sieve to remove chunks. To make different tints, fill small spritzer bottles with water and add about 6 drops of food coloring to each.
2. Pour 1 cup of powdered mixture into a glass bowl. Lightly spritz, stirring after each spritz, until powder is desired color. Add water slowly, so mixture does not fizz. If mixing two tints, alternate colors as you spritz. Check the consistency of powder with your fingers; when it can be tightly packed or shaped, stop spritzing (this may take a little while).
3. Select an essential oil. Add 5 drops if it's one of the stronger scents (peppermint, lavender), 6 if it's a weaker one (lemon, grapefruit). Mix well. Firmly pack mixture into small baking molds. We used 1/4 cup for each fizzy, which is good for one bath. Allow mixture to set for 2 hours, then pop out carefully. Repeat with different tints for remaining powder.

Tuesday, February 19, 2013

Jewelry Spotlight - Bastille Bleu Lampwork


Spring Reeds Handmade Lampwork Glass Beads BASTILLE BLEU Green Striped Rounds

This week's jewelry spotlight is on Kimberly Nicole Rogalski from Bastille Bleu Lampwork.  Kimberly specializes in making her own absolutely gorgeous lampwork beads!!  Kimberly is a self-taught glass artist.  She creates bead art that is versatile, eclectic, colorful, and whimsical.  She has also begun branching out into jewelry design, stamped metal, and wirework. I just love her use of color and the depth to which she makes her beads.  The detail work on some of these beads is also truly magnificent!!

Her work is phenomenal and has been featured in "An Introduction to Working with Art Glass Beads:  The Beader's Handbook on Lampwork" by Debby Gwaltney.


You can find Kimberly's work on her website Bastille Bleu or check her out on Etsy or ArtFire.
  Keep Calm and Melt Glass - Handcrafted by BASTILLE BLEU Lampwork Brass Vintaj Turquoise

Make sure you follow her Facebook page also for "sneak peeks" of new items!

Floral Focal Bead - Handmade Lampwork by Bastille Bleu SRA Pink Large  Snowball Sirius Ring Topper - Handmade by Bastille Bleu Lampwork

For you tweeters - Follow her on Twitter too!!


Monday, February 18, 2013

DIY ~ Easter Egg Tree


Produced by Gema Beneitez

Step 1: Color the Eggs

Wrap rubber bands around raw eggs. Mix 20 drops food coloring, 3 cups water and 2 tablespoons vinegar. Add the eggs and leave for 10 minutes. Push pins into an art board, 1/2-in. apart, to create a grid for drying. Remove eggs and leave to dry.
Step 1: Color the EggsSue Ferris[+]

Step 2: Remove Yolk and White

Remove rubber bands. Use a pin to make a hole in the base of an egg, then perforate around it to extend the hole to 1/8-in. wide. Make a hole in the top the same width as the dropper nozzle. Insert the nozzle and squeeze the pump, forcing the egg into a bowl.
Step 2: Remove Yolk and WhiteSue Ferris[+]

Step 3: String Up the Shells

Cut 12-in. lengths of 3/16-in.-wide ribbon and knot one end of each. Bend the end of a 6-in. piece of fine wire into a loop, thread ribbon through and feed the wire and ribbon through the egg, using the knot as a stopper. Tie onto painted branches or bamboo.
Step 3: String Up the ShellsSue Ferris[+]
Finished TreeSue Ferris[+]

Friday, February 15, 2013

Million Dollar Casserole

Million Dollar Casserole

from:   http://www.sweetandsavoryfood.com

I've showcased this dish before, but this version is a little different.  The original name of this dish is Million Dollar Spaghetti.

But, I was out of spaghetti.  So, enter in elbow macaroni.  Pretty much the same dish, just a slightly different look.

I texted my good friend that gave me this recipe years ago last weekend saying I was making it.  You know it's a keeper when she texted back that she was just talking about it and she is also putting it into charity cookbook she is working on.  Keeper!


Refrigerate overnight, then bake at 350 degrees for 45 minutes.

We ate this for three meals this week.  I'm not kidding.  And lunches.  It makes that much.  Luckily it reheats well and tastes great the second....and third time!
 
 
Million Dollar Spaghetti

1 lb. spaghetti noodles/macaroni
1 lb. ground beef
1 jar spaghetti sauce
1/4 c. sour cream (I used light)
1/3 c. chopped onion
3 T. unsalted butter, melted
8 oz. block of cream cheese (I used light)
8 oz. cottage cheese
1 t. garlic salt

Cook spaghetti, drain and set aside. Saute ground beef and onion until brown, drain and add spaghetti sauce, set aside. Combine cottage cheese, cream cheese, sour cream, and garlic salt. In a 9x13 greased pan, spread 1/2 of the spaghetti noodles, cover with cheese mixture, and add remainder of spaghetti. Pour melted butter over spaghetti, and then spread the meat mixture on top. Chill (can be refrigerated overnight), and remove from fridge 20 min. before baking. Bake at 350 degrees for 45 minutes.


Thursday, February 14, 2013

Happy Valentine's Day

My Mom and I would like to wish everyone a very Happy Valentine's Day!!  Hope everyone has a wonderful day filled with love and laughter!!!


From the Sparkly Ladies
Girlie Gals & BrankletsNBling

Wednesday, February 13, 2013

Red Heart Cookie Valentine's

Instead of sending the same 'ole Valentine's with my kids to school this year, I wanted to try something a little different.  I found this idea and recipe from A Spicy Perspective's Blog.  These look really cute and she has the tags you can print out to go with them also.  I think I'm going to have to triple the recipe however, to make enough for two classes :)-


Red Velvet Cookie Pops + Free Printable Tags for Valentines Day! #cookiepops #redvelvet #freeprintables #valentinesday

Red Velvet Cookies on Sticks + Free Printable Tags for Valentines Day! #cookiepops #redvelvet #freeprintables #valentinesday

How to Make Red Velvet Cookie Pops + Free Printable Tags for Valentines Day! #cookiepops #redvelvet #freeprintabletags #valentinesday
Today I’ve got a little treat that is sure to make your loved ones feel celebrated this Valentine’s Day, Red Velvet Cookie Pops!
These Red Velvet Cookies are tender and moist with the subtle flavors of red velvet cake. After all, a red velvet cake is just a simple buttermilk cake with a little cocoa powder and a whole lot of food coloring.
Free Printable Tags for Valentines Day! #cookiepops #redvelvet #freeprintables #valentinesday
Here I’ve mimicked the flavors of red velvet cake by adding cocoa, and a touch of vinegar to my favorite roll out cookie recipe. The vinegar gives the cookies a very mild twang, like buttermilk.
Then I made a thick (not fluffy) cream cheese frosting to “glue” the red velvet cookies together on lollipop sticks. The frosting hardens just enough to keep the red velvet cookies fastened to the sticks.
Red Velvet Cookies + Free Printable Tags for Valentines Day! #cookiepops #redvelvet #freeprintables #valentinesday
Cute Free Printable Tags for Valentines Day! #cookiepops #redvelvet #freeprintabletag
These sweet little tags, will make your Valentine offerings even more special, with space to personalize them.
I made these free printable tags using graphics from CocoaMint.com (with permission from the owner to share them with you.) CocoaMint.com offers an array of affordable cute-and-clean graphics to make homemade birthday invitations, cards, and crafts really stand out. For more Valentine graphics and ideas, make sure to check out the site!

FREE PRINTABLE TAGS FOR VALENTINES DAY

To Use:
  • Click Here to Print. Print button on the top left corner. (White cardstock recommended.)
  • Trim the tags and punch a hole on the top of each tag.
  • Tie each tag to a red velvet cookie pop with ribbon or string.
Heart Cookie Pops + Free Printable Tags for Valentines Day! #cookiepops #redvelvet #freeprintabletags #valentinesday
YIELD: 16-17 COOKIE POPS

PREP TIME: 30 MINUTES ACTIVE TIME

COOK TIME: 6-8 MINUTES

Red Velvet Cookie(s) Pops


Ingredients:

For the Red Velvet Cookies:
  • 1 stick unsalted butter, softened (1/2 cup)
  • 1/2 cup sugar
  • 1 egg
  • 1 tsp. vanilla extract
  • 1/2 tsp. rice vinegar
  • 1/4 tap. salt
  • 2 tsp. unsweetened cocoa powder
  • 1 1/4 cups all-purpose flour + extra for rolling
  • 1/4-1/2 red food coloring gel
For the Cream Cheese Frosting:
  • 4 oz. cream cheese
  • 1 tsp. vanilla extract
  • 1 pinch salt
  • 1 1/2 cups powdered sugar + extra for sprinkling
  • 16-17 lollipop sticks

Directions:

  1. Using an electric mixer, cream the butter and sugar together until extremely light and fluffy, 3-5 minutes. Then add the vanilla, vinegar and egg and beat until well combined.
  2. Then beat in the salt, cocoa powder and food coloring, scrape the bowl and beat again for even coloring. Add the flour slowly and beat until just combined. Press the dough flat on a piece of plastic wrap, and wrap well. Refrigerate for at least one hour.
  3. Preheat the oven to 375 degrees F and line two cookie sheets with parchment paper. Flour a work surface, then roll the dough evenly to 1/8 inch thick. Using a 2 inch heart cookie cutter, cut out the cookies close together. Use a small spatula to carefully move them to the cookie sheets. Gather the remaining dough and reroll and cut to get 32-34 cookies. (Cut the cookies close together and do not roll the dough more than twice, or the cookies will be tough.)
  4. Bake for 6-8 minutes. They should come out of the oven soft, not crisp. Cool completely on the baking sheets.
  5. Using an electric mixer, beat the cream cheese, vanilla, and salt together. Slowly add the powdered sugar until smooth. Place the frosting in a piping bag.
  6. Turn half of the cookies over and pipe a thick ribbon of frosting in a V shape on the flipped cookies. Press a lollipop stick into the frosting, then gently press another cookie on top to flatten out the frosting. Allow the red velvet cookie pops to dry a bit (30 minutes) for the frosting to set up and hold the cookie on the stick. Sprinkle with powdered sugar and serve.